D Using your site for e-Commerce
Download PDF Version
1. Introduction
Our system allows you to set up an online shop on your website. It does this by adding shopping features to your gallery/ies, so that your users can buy prints, originals or any other items you would like to sell. They can pay online via your PayPal account (see appendix below if you're unfamiliar with PayPal) or offline if you prefer, or a combination of both. IMPORTANT. It is vital that you have validated your registered email address with us before using our ecommerce facility!
2. Setting up your site for ecommerce
2.1 Set up/edit your PayPal account
Set up a PayPal account. If you wish to take online payments you can do so via a PayPal Business or Premier Account account (PayPal personal accounts will not work): Go to www.paypal.co.uk or www.paypal.com Opt for either Business Account or Premier Account Take a note of your PayPal email address, as you will need this when you go back into the Admin system.
Activate 'Auto return. We also advise you to set up Auto return in your PayPal settings, so that your customers will automatically return to your website once they have finished their payment in PayPal. Log onto PayPal Under the My Account tab select Profile Select My selling preferences Under Website preferences (nearly half way down), click on Update Tick On for Auto return Under Return URL, enter your domain, eg http://www.joebloggs.com or http://www.clikcraft.com/joebloggs Scroll down to the bottom and Save.
2.2 Linking up your site
Click on Ecommerce Payment integration in the admin system. You will a screen like this. Use the following notes to help complete it.
i. Payment options
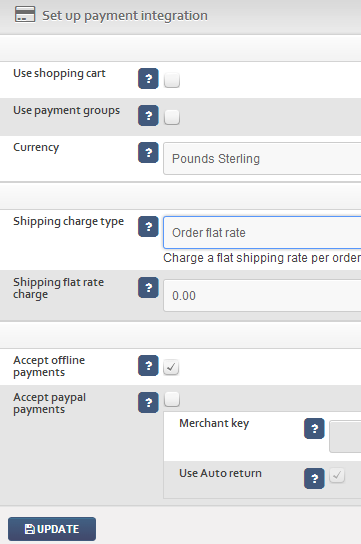
Use shopping cart. This is usually ticked, so that your visitors can add items to the cart and proceed to a checkout, rather than a separate order for each item. When you tick this option, a new section is automatically added to your site, which you can edit in Sections.
Use payment groups. These are used if, for example, there is more than one price for a particular product, eg for different print sizes. Leave blank if you are unsure, as we will cover this later on.
Currency. Select your currency, which your prices will be quoted in. If you are using PayPal, this currency must be available from them.
ii. Shipping options
Shipping charge type. If you would like the system to add a shipping cost, choose whether you want to apply a flat rate per order, or a staggered one depending on the total order value. If you select Staggered then the system will prompt you to enter the staggered fields you would like further below.
Shipping flat rate charge. If you have selected a flat charge, enter it here. Remember, do not enter a currency sign.
iii. Payment methods
Accept offline payments. Tick this box if you want to accept offline payments, eg payment by invoice, cheques, etc (handy for business to business users where invoicing is usually done separately). You can choose to accept both offline and online payments, so your customers can choose which is more suitable for them. See 3. below for details.
Accept PayPal payments. Tick if you are using PayPal.
Merchant key. If so, enter your primary PayPal e-mail address.
Use PayPal Auto return. Tick if you have set up Auto Return in PayPal (recommended, see 2.1 above).
Click on UPDATE. You are now integrated with your payment provider! The next step is to set up your prices, which we cover in 4. below.
2.3 Selling without a payment provider (or as well as)
Some users prefer visitors to contact them directly if they are interested in placing an order, and will typically accept payment by bacs or cheque. You can still use the integrated shopping cart to do this. You can even combine online payments with offline, in which case your customer will be offered a choice when buying. Instead of making a payment at the end of their order, your customers will be taken to the checkout page where they can enter their details and the order will be saved for you to view in your admin system (see 5. below for details). You then process the order and arrange payment yourself.
For this to work, all you have to do is go to Ecommerce Payment integration Tick Accept offline payments UPDATE.
3.The different ways you can set up pricing
3.1 Assigning a single price to a single item
If you are selling differently priced items – such as a limited edition or single work - you can assign a price to an individual item. To do this, just go to the respective record in Images/Galleries Images and enter the price in the field Item price. But don’t enter the currency sign! You can also enter a Single item description, which appears in the Shopping cart, eg “Limited edition set of 50” or “Oil on canvas”.
3.2 Setting up payment options
In practice, however, most artists and photographers sell prints and usually offer a range of payment options for each image, typically defined by print size, eg 300mm x 400mm for £10.00, 400mm x 500mm for £15.00, etc. You can enter as many payment options as you like. To do this, go back to the Payment integration page in the admin system Click on ADD A NEW OPTION down at the bottom Complete the fields in the box that appears as follows.
Option name. This would typically be the print size, eg 300mm x 400mm. Description. If you would like to add some text, eg Mounted on card. Price. Enter the price but do NOT enter a currency! eg 2.99. Sort order. Best to use larger integer numbers such as 10, 20, etc.
By default, these prices apply to ALL images on the website, which can save you hours of time pricing every individual image. If this is what you require, then you can move straight to 4.5 below.
However, you may want to apply different price options to different types of work/galleries, eg you may want to charge more for your panoramics. Our system allows you to do this by setting up price groups and then applying them to a gallery or an individual image. Please note, this therefore means you will need to place similarly priced items in the same gallery.
3.3 Applying price groups to your images
To apply a price group to an entire gallery, click on Images/Galleries, then edit against the required gallery Select the price group required under Payment group. To apply a price group to an individual image, follow the same procedure but tick edit against the image’s record in Images and select the Payment group.
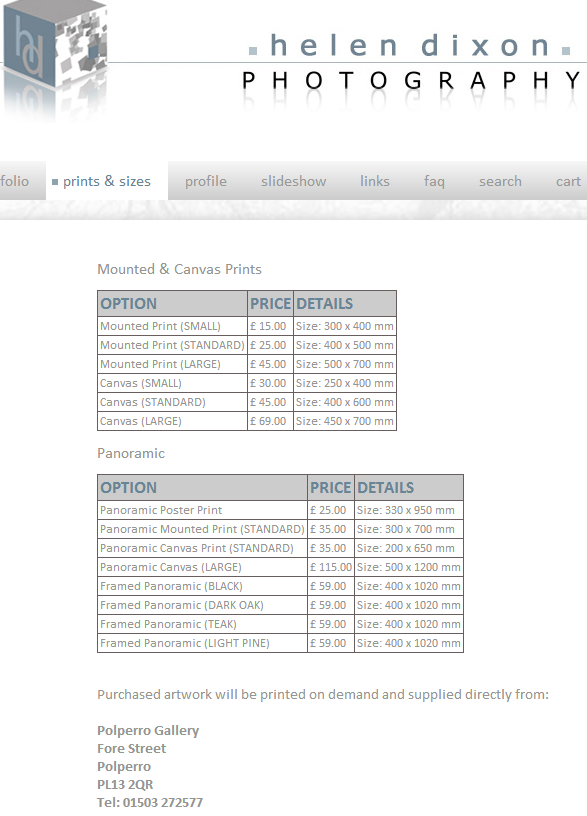
3.4 Using the pricing information page
As an option, the system can automatically create a Section which neatly and automatically lays out your pricing information – and groups if you have them. Ensure you tick Show on pricing information page for the respective payment groups to show them here. If you don’t use groups all your options are listed in a single table.
3.5 VAT and other options
It is possible to configure PayPal to automatically charge for VAT (and some other options). However these options are configured via PayPal’s system and so we are unable to offer support.
4. How the shopping cart works
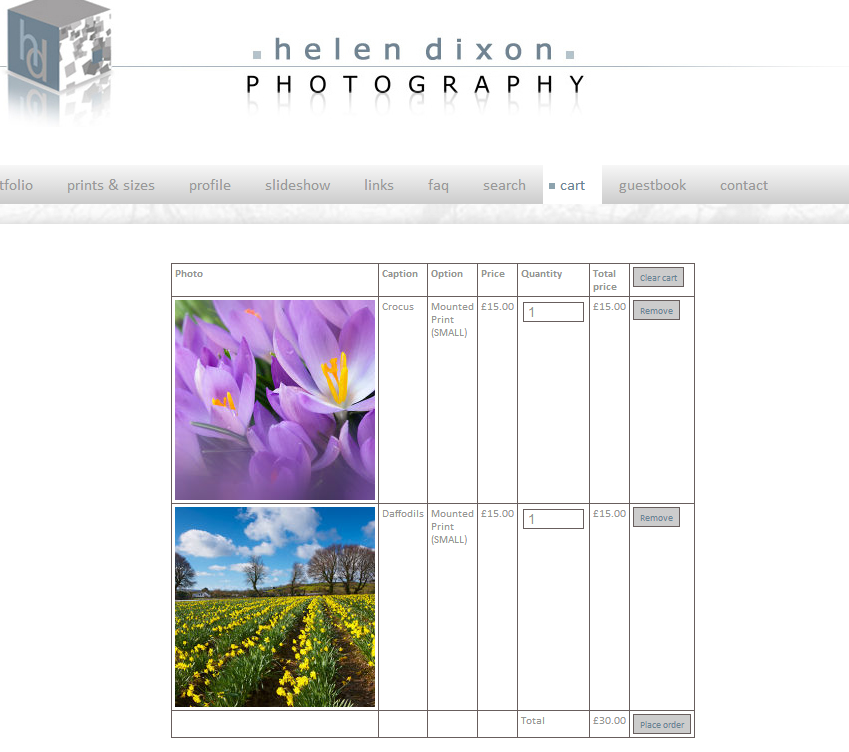
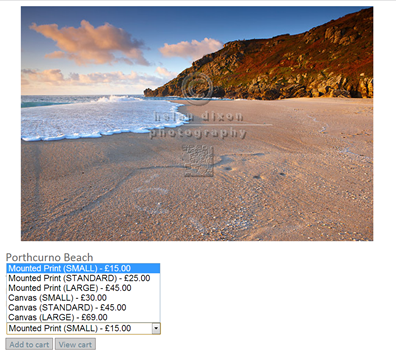
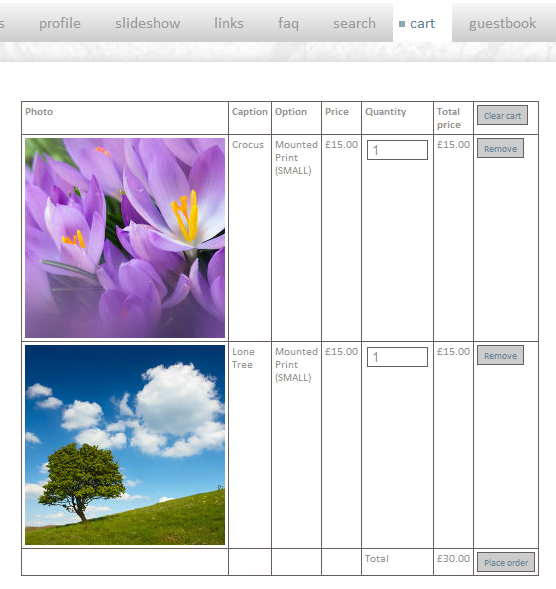
After you have added a shopping cart to your site and set up some pricing options, when a visitor views an image in your gallery they will see two buttons: one to add the image to their cart, and one to view the cart. Once an item has been added to the cart, they can view the selection on the shopping cart page. This is done by either clicking the shopping cart section in the menu or by selecting the view cart button next to the image.
On the cart page, visitors can update the quantities of the items they’ve ordered or remove them altogether. They can also remove all the items from the cart in one go. When the order is ready the customer clicks the submit button in the bottom right-hand corner (labelled Place order by default).
If you’re integrated with Paypal, the order will be sent to them for the payment to be made. If your site doesn’t have a payment system linked to it, the visitor will be taken to the checkout page where they can enter their details and the order will be saved for you to view in your admin system. You then process the order and payment yourself.
5. The checkout form (if accepting offline payments)
Both a checkout form and a checkout section are created automatically when you tick Use shopping cart (see section 3. above) so it still works like a typical ecommerce site, even though you are not taking online payments.
In addition a new Form is created for the checkout page (just like the standard Contact form we provide), which by default asks customers for their name, address, postcode and email address. This can be edited like any other Contact form to include additional questions and/or edit various pieces of text used in the checkout process, eg you may wish to add a phone number field in case you need to contact them about their order. See Cliktips Guide C6 Editing forms for instructions. Please be assured it is very easy and quick to do!
To delete the shopping cart and checkout sections, deactivate the shopping cart feature. The form attached to the checkout at the time will also be deleted.
6. Viewing orders in the admin system
Once customers have placed an order via your site, their order will appear in the system under Orders, which can be access via the shortcut menu in the top of the admin system, or by going to Ecommerce Orders. New orders will be alerted at the top of the menu.
From the orders list, you can select an order to view.
To print the order, just select Print from your browser’s menu. The system will automatically print a printer friendly version.
When you have processed the order, change its Status to Processed to ensure it doesn’t appear in the list of new orders.
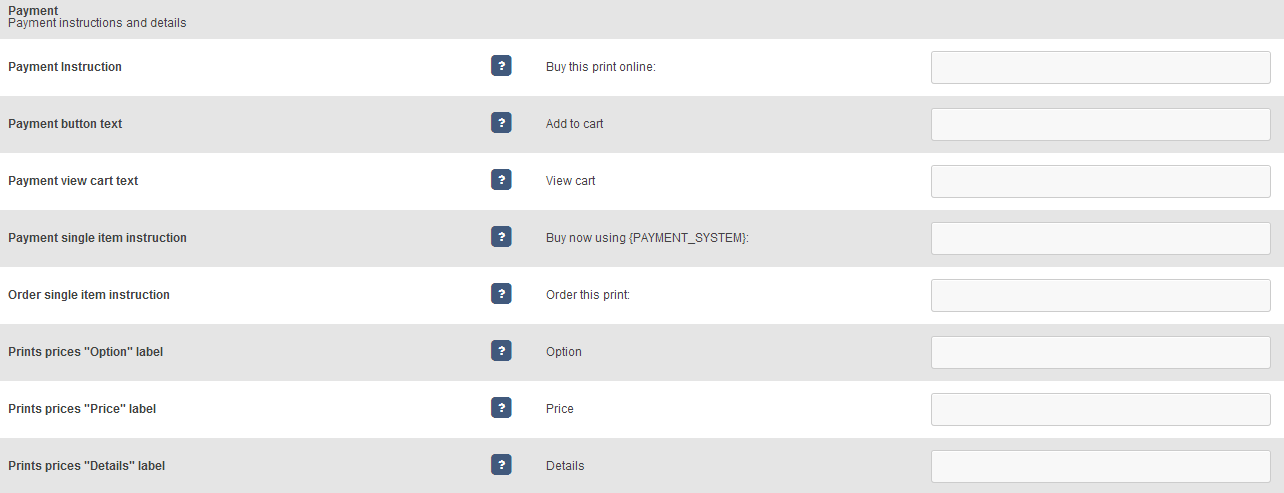
7. Editing some of the default text fields
There is a variety of default text fields used on your site throughout the shopping process, such as Add to cart or Order this print. These can be quite easily changed. Just go to Site management Text/Language Scroll down until you see the heading Payment Work your way through the different items listed and edit whatever text you would like.

8. Have a look at http://www.helendixonphotography.co.uk
Helen Dixon is a professional outdoor photographer and user of our system. Not only is it worth visiting her site to see her beautiful work, you can also see how our ecommerce system works, which Helen has set up very well. This includes some of the features we have covered in this guide, such as using a Payment groups and setting up a Pricing information page, which she has re-named prints & sizes.
Please note, as a busy professional photographer, Helen is unable to respond to queries about her site build.
9. APPENDIX: About PayPal
PayPal is an established online payment system that allows you to receive and make payments via a PayPal account. It is used widely throughout the www, including Ebay who purchased it in 2002. Visit www.paypal.co.uk or www.paypal.com for more information.
Our system cleverly links up to your PayPal account so that it can be used with our ecommerce functionality. We do not have any formal relationship with PayPal nor do we receive any payments from them. We just make it easy to link up our sites with their payment sytem.
